Page 12 of 22
Re: Viper rebuild
Posted: Mar 26, 2013 7:07 pm
by proprider
Finishing off the splashwell deleates also. Going to redrill for some 2" tubing and will be installing a set of cleats in the well too.
While grinding in the well, came across this situation, what to do about the tattered serial plate. It looks to be made as a decal but has 4 rivits in it. I'm suspicious if it's original. It appears to be stamped with a 150hp rating for 4 persons or 1,000lb. The serial number shows 15VI2192P. There is no other number anywhere on this hull or deck.....confused.
Re: Viper rebuild
Posted: Mar 26, 2013 7:42 pm
by Sonik
I think its legit although I'm not familiar with placement on hulls older than my own. Its a metalized decal with rivets in all four corners. Below is a pictue of mine on the port side of the dash.
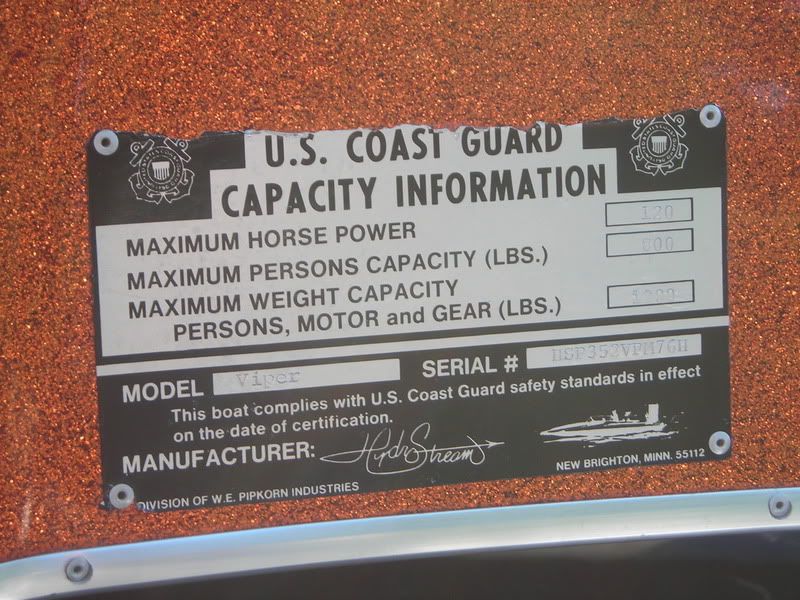
Starting in 1976, Hydrostream went to the format (more or less) pictured in my photo above. Prior to that, the HIN format was a little different. I have NOT however seen a HIN like that on a '73 or newer hull that does not start with "HSP". Check out this link to Hydrostream.org HIN decoder and also this link to the registry for reference.
http://www.hydrostream.org/HIN.htm
http://www.hydrostream.org/HIN.pdf
Re: Viper rebuild
Posted: Mar 26, 2013 8:27 pm
by proprider
I guess it better be left as-is and just clear over it. The number stamped on it doesn't match anything to the links Jeff posted and there's no indication in the number to represent a model year.
Re: Viper rebuild
Posted: Mar 27, 2013 2:37 pm
by Surface Scratcher
As far as the i.d. plate, It looks like you've got one of the old Vipers. What year do you think it is? It's got the squared splashwell and so probably no hook built into the pad!

Keep up the good (art)work.
Re: Viper rebuild
Posted: Apr 15, 2013 7:25 pm
by proprider
Got the new gages drilled in the dash. Not sure where the gps recall switch will go but i'm thinking about mounting the merc kill switch somewhere on the seat base. When running a tandom seat setup, does anyone have a kill switch on the passenger too??
Re: Viper rebuild
Posted: Apr 15, 2013 7:27 pm
by proprider
All the "chassis" work is completed. Finishing up by added some additional cloth/resin on the sides of the chine where you would step into the hull. After that will be the sanding process again and paint. There will be about 3" of the top edge left unpainted for glassing the deck back on.
Re: Viper rebuild
Posted: Apr 15, 2013 11:11 pm
by aaron78viper
that is an absolutely gorgeous stringer system.. if I had that in my boat I would never paint or use it. just look at it all the time. nice job on all that
Re: Viper rebuild
Posted: May 14, 2013 7:04 pm
by proprider
Another advantage of splitting the deck/hull was discovered. When the throttle was getting bolted in, found myself trying to squeeze under the steering wheel while bumping my head and back, then quickly realized the deck could be scooted forward. I'm a regular student at the school-of-hard-knocks
Re: Viper rebuild
Posted: May 14, 2013 7:11 pm
by proprider
Mocked up the motor position so that the prop shaft was close to the pad height. I needed to be able to figure out what length cables would be needed for the throttle and shifter. Sure am glad the motorboard was built up a little taller. Checked the travel on the jackplate and there will be no problem getting the prop shaft above the pad.
Re: Viper rebuild
Posted: May 14, 2013 7:13 pm
by proprider
Setting up the routing